How to make hidden files and folders visible
Some files and folders are hidden by default. For example, this is true for the Microsoft Word STARTUP folder and it may also be true for the folder in which the Word template Normal.dotm is stored.
If you are going to install a Word add-in manually, you need to find the Word STARTUP folder. In order to do that, the folder must be visible. This article explains how you can make hidden files and folders visible.
Did you know that...
DocTools Word Add-Ins
can help you save time and work more efficiently in Word
Generate complete documents in seconds from re-usable text or graphics
Manage comments in Word fast and easy – review comments, extract comments to Word or Excel, etc.
Simplify and speed up the management of cross-references even in your most complex documents
Manage and repeat data in Word fast and easy with custom document properties and DocProperty fields
Extract insertions, deletions and comments from any Word document, incl. context and headings
Apply any highlight color or remove highlight in Word with a single click – customizable shortcuts
Browse pages, sections, headings, tables, graphics, etc. and find text in Word with a single click
Check safety-critical procedure documents for human factor issues in minutes – improve quality and help prevent errors
Create screen tips in Word fast and easy – with up to 2040 characters
Follow the steps below to make hidden files and folders visible
Windows 10 – fastest method
- Open a File Explorer window.
- Select the View tab in the Ribbon and turn on the options File name extensions and Hidden items.

Windows 10 – show hidden files and folders and file name extensions via the View tab in the Ribbon.
Now the files and folders that were previously hidden should be visible.
When File name extensions is turned on, you will see files names as e.g. MyAddIn.dotm instead of just MyAddIn or you will see MyDocument.docx instead of just MyDocument. It is helpful to see the file extension since it provides information about the specific type of file.
You can also set the options for hidden files and folders via the alternative method below, using the Folder Options dialog box.
Windows 10 and older Windows versions
- Open a File Explorer window (Windows Explorer in earlier versions than Windows 10).
- Follow the relevant bullet below to open the Folder Options dialog box:
- Windows 10: Select File > Change folder and search options.
- Microsoft Windows Vista, Windows 7 or Windows 8: Click Organizer in the top-left corner of the window. Select Folder and Search Options.
- Windows XP: Select Tools > Folder Options.
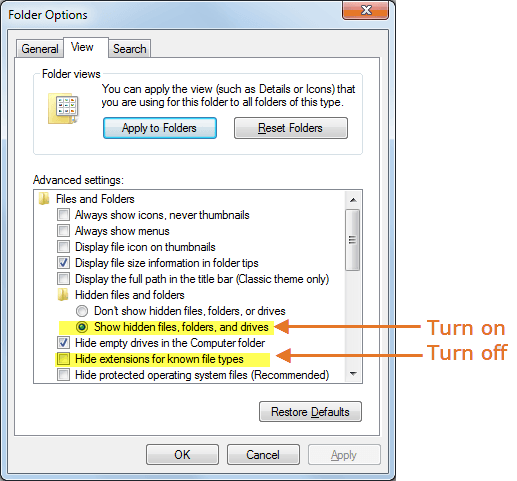
- In the Folder Options dialog box, select the View tab.
- On the View tab:
Turn on Show hidden files and folders.
Turn off Hide extensions for known file types. - Click OK.
When Hide extensions for known file types is turned off, you will see files names as e.g. MyAddIn.dotm instead of just MyAddIn or you will see MyDocument.docx instead of just MyDocument. It is helpful to see the file extension since it provides information about the specific type of file.

Folder Options settings. Note that the options are sorted alphabetically. If you are not using an English system, the options will be named and thus sorted differently.
Now the files and folders that were previously hidden should be visible.

